Shopify Popup Setup: Step-by-Step Guide
Popups on Shopify have a bad reputation because many are implemented at the wrong time, with the wrong offer, and with no limits.
Popups on Shopify have a bad reputation because many are implemented at the wrong time, with the wrong offer, and with no limits. But when you set them up with clear intent, good targeting, and sane frequency rules, they can do three things extremely well for ecommerce teams:
- Capture emails and SMS with a compelling first purchase incentive
- Reduce cart abandonment (especially for price or shipping objections)
- Collect fast, high-signal feedback while visitors are still in context
This guide walks you through a practical, Shopify-native popup setup, including exactly where to install a script in your theme, what to test, and the guardrails that protect UX and SEO.
Before you touch Shopify: decide what the popup is supposed to change
A popup is not a channel, it is an intervention. If you do not define the “job” first, you will end up measuring the wrong things (like email capture rate only) and miss the real outcome (like profit per visitor).
Start with one primary goal:
- Lead capture: build your list for launches, drops, seasonal promos, or back-in-stock
- Conversion lift: reduce abandonment or increase first-order conversion
- AOV lift: promote bundles, free-shipping thresholds, or add-ons
- Feedback collection: learn what blocks purchase or what products people want
Then write down one measurable outcome you will track for 2 to 4 weeks (examples: email signups per 1,000 visitors, checkout completion rate, revenue per session, discount usage rate).
| Popup goal | Best placement | What to measure (minimum) | Common mistake |
|---|---|---|---|
| Email capture | Home, collection, blog | Signup rate, downstream first purchase rate | Measuring signups but not revenue impact |
| Abandonment save | Cart page, checkout entry (where allowed) | Checkout completion, conversion rate | Showing too early and discounting everyone |
| AOV lift | Cart drawer, cart page | AOV, attach rate, gross margin | Offering discounts that erase profit |
| Feedback | Post-add-to-cart, post-purchase, exit intent | Response rate, top themes | Asking too many questions |
Choose your Shopify popup approach (app vs script)
Most Shopify popups are implemented one of two ways:
- A Shopify app installed from the App Store (often easiest)
- A script-based widget you add to your theme (common for lightweight tools and custom setups)
| Approach | Pros | Cons | Best for |
|---|---|---|---|
| Shopify app | Quick install, often has theme integration | Can add bloat, overlapping features, lock-in | Stores that want a bundled solution |
| Script-based widget | Lightweight, flexible, can be tool-agnostic | You must paste code into the theme and test | Teams that care about performance and control |
If you are using a lightweight widget like Modalcast (feedback, updates, lead capture, offers), you typically install a small script once, then manage campaigns from the widget dashboard.
Shopify popup setup (step-by-step)
The steps below work whether you are using Modalcast or another popup tool that provides a JavaScript snippet.
Step 1) Create the popup content first (do not start in Shopify)
Build the smallest possible popup that can prove value.
Good “first popups” for Shopify:
- First-time visitor offer: “Get 10% off your first order” (or free shipping) in exchange for email
- Cart objection check: a one-question microsurvey, “What’s stopping you from checking out today?”
- Back-in-stock capture: email capture on product pages for sold-out items
- Bundle nudge: “Add X to unlock free shipping” (works best in cart)
Keep it simple:
- One clear headline
- One primary CTA
- One field (email) if you are capturing leads
- One question if you are collecting feedback
If you want a deeper playbook for feedback-specific widgets (timing, friction, trust cues), see Feedback Widget Design Tips That Boost Responses.
Step 2) Grab the install snippet from your popup tool
In your popup tool, you will usually find an “Install” or “Widget” section that provides a script snippet.
You are looking for something that resembles:
- A
<script>tag - A project or widget ID
- Optional configuration settings
Copy it as-is.
Step 3) Duplicate your Shopify theme (so you can roll back)
In Shopify Admin:
- Go to Online Store → Themes
- Find your current theme
- Click … (three dots) → Duplicate
Work on the duplicated theme first. Once you confirm everything works, publish it.
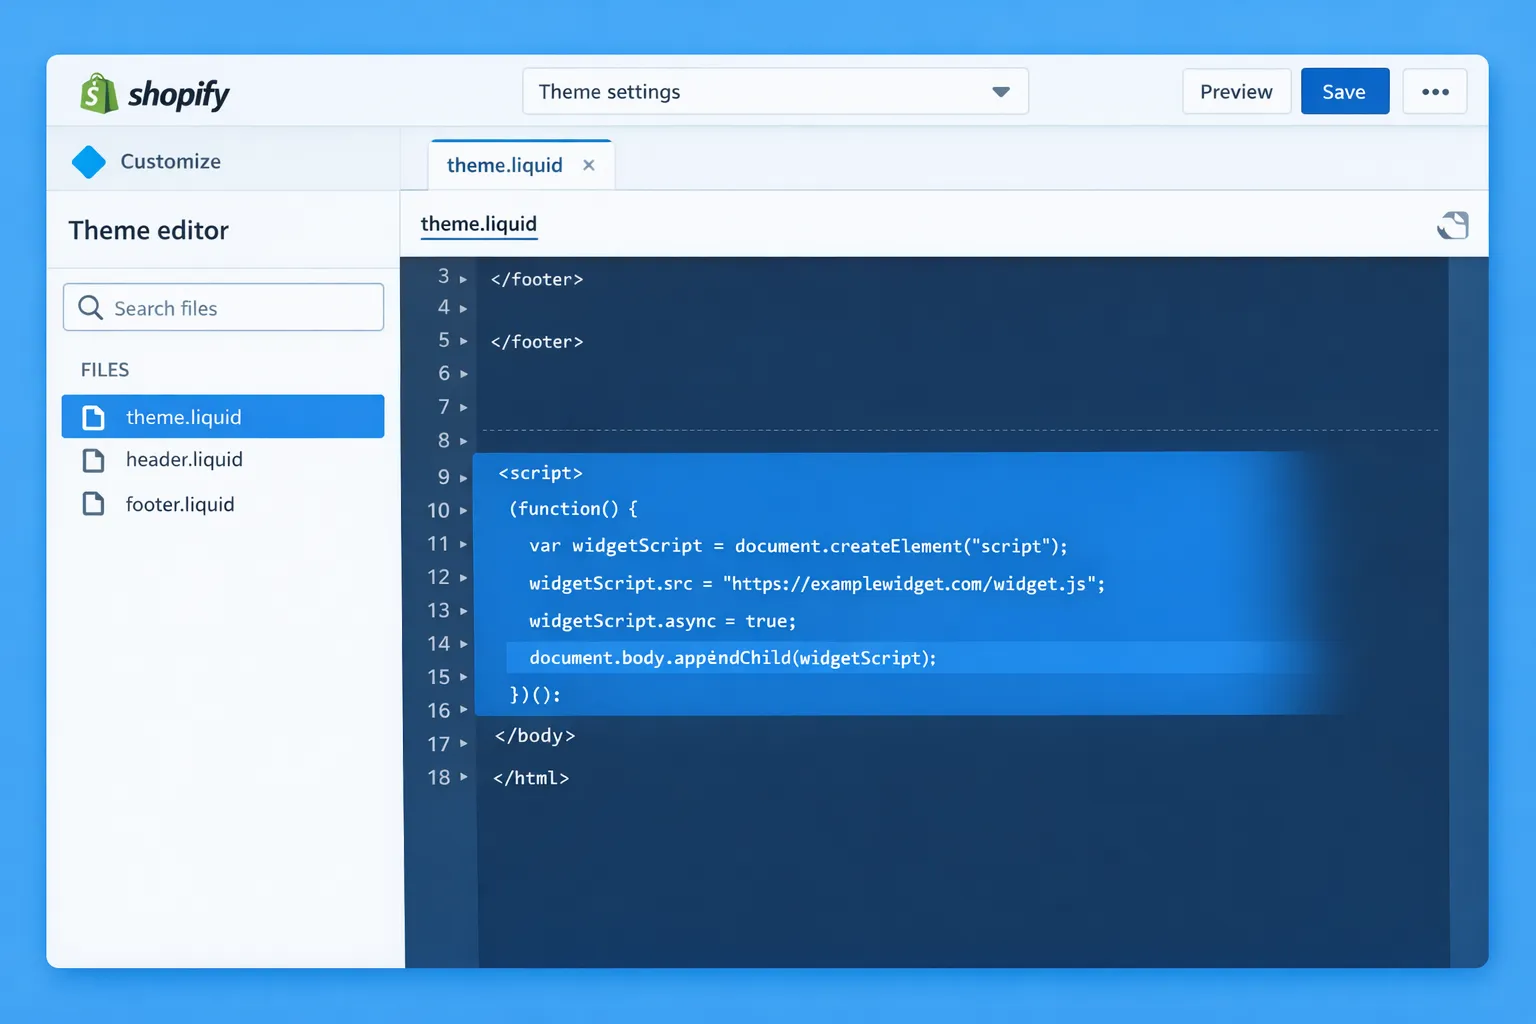
Step 4) Install the snippet in theme.liquid
In Shopify Admin:
- Go to Online Store → Themes
- On your duplicated theme, click … → Edit code
- In the left sidebar, open layout →
theme.liquid - Paste the script snippet just before the closing
</body>tag - Click Save
Why </body>? It is a common best practice for third-party widgets because it reduces the chance of blocking critical page rendering.
Alternative (for some themes): You can also add a script via a Custom liquid block in the theme editor (Online Store → Themes → Customize), but theme.liquid is typically the most reliable for site-wide installation.
For Shopify’s official steps on editing theme code, reference Shopify Help Center guidance.
Step 5) Verify the snippet loads on your storefront
Open your store in a private window.
Check:
- The popup tool’s preview works
- The widget does not appear twice
- Pages load normally (no layout shift, no broken cart)
If your popup tool provides a “verify installation” status in its dashboard, use it.
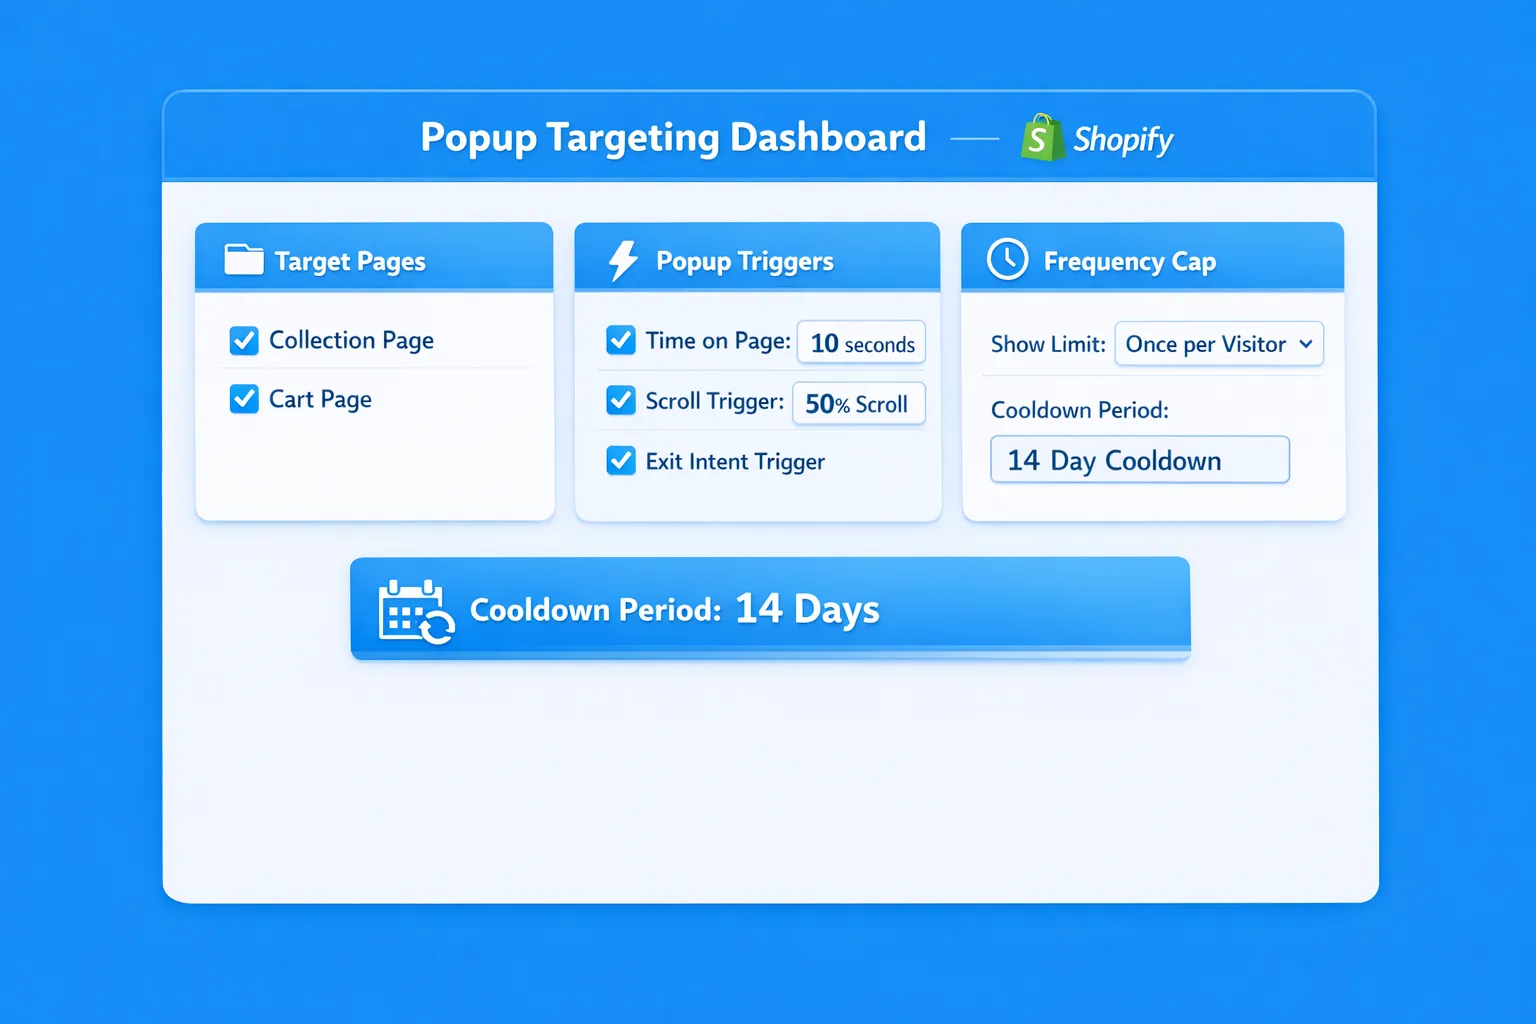
Step 6) Configure display rules that match intent (not vanity)
Most popup tools let you choose where and when the popup shows. This is where Shopify teams win or lose.
Practical targeting rules:
- Exclude checkout and account pages unless you have a very specific reason (and your tool supports it safely)
- Show lead capture on home, collection, and blog pages, not on every product page by default
- Show cart save offers only on cart (or after add-to-cart)
A simple “intent ladder” that works well:
| Visitor intent signal | Example trigger | Suitable message |
|---|---|---|
| Low | 10 to 20 seconds on site | Email capture with light incentive |
| Medium | 50% scroll on a collection | “Need help choosing?” + short quiz or product finder |
| High | Added to cart | Free shipping threshold, bundle add-on |
| Leaving | Exit intent (desktop) | “Before you go…” objection survey or limited offer |
If you are unsure, start with one rule and one page group. You can always expand after you confirm the popup is not harming conversion.
Step 7) Add frequency caps so you do not burn returning visitors
Frequency capping is the difference between “helpful” and “annoying.” You want visitors to feel like the message is timely, not persistent.
A good default for Shopify lead capture:
- Show at most once per session
- Then suppress for 7 to 14 days after dismissal
- Suppress immediately after signup
For cart-related popups:
- Limit to once per session
- Suppress after purchase
If you want a framework you can copy into your internal “popup policy,” see Popup Frequency Capping That Protects UX.
Step 8) QA on mobile and confirm accessibility basics
Shopify traffic is often majority mobile. A popup that is “fine on desktop” can be unusable on a phone.
Minimum QA checklist:
- Can you close it easily with a thumb?
- Does it cover the entire screen?
- Does it trap scroll?
- Is text readable without zoom?
Also check basic accessibility:
- Visible close button
- Keyboard focus does not get lost (important for desktop)
- Color contrast is adequate
Step 9) Track results beyond signup rate
If you only track popup conversion rate, you will almost always be pushed toward bigger discounts and more aggressive timing.
Track both “good” and “guardrail” metrics.
| Category | Metric | Why it matters |
|---|---|---|
| Outcome | Revenue per session | Captures overall business impact |
| Outcome | Checkout completion rate | Detects conversion harm early |
| Outcome | Email signup to purchase rate | Measures lead quality |
| Guardrail | Bounce rate / quick exits on key pages | Flags annoyance or mis-timing |
| Guardrail | Popup dismiss rate | Indicates poor relevance |
If your popup tool supports A/B tests or holdouts, use them. If not, do a simple before/after with stable traffic periods and avoid changing multiple things at once.
Three real-world Shopify popup setups (with copy you can adapt)
These are intentionally simple so you can ship them quickly and iterate.
1) First-time visitor email capture (collection pages)
- Where: collection pages only
- When: 15 seconds or 50% scroll
- Who: new visitors only
- Cap: once per session, suppress 14 days on dismiss
Copy example:
- Headline: “Get 10% off your first order”
- Body: “We’ll send a one-time code. No spam.”
- CTA: “Send my code”
2) Cart objection microsurvey (cart page)
- Where: cart page
- When: 8 seconds on cart page (or exit intent on desktop)
- Who: visitors with items in cart
- Cap: once per session, suppress 7 days after response
Question example:
- “What’s the main thing stopping you from checking out today?”
Add 4 quick options:
- Shipping cost
- Delivery time
- Need to compare
- Not ready
Then include an optional free-text field: “Anything else?”
This gives you product and pricing insights without forcing a discount.
3) Free shipping threshold nudge (cart)
- Where: cart page
- When: immediately after cart loads
- Who: carts below free shipping threshold
- Cap: once per session
Copy example:
- “You’re $12 away from free shipping”
- CTA: “Add bestsellers under $15”
This one is especially effective when it links to a pre-filtered collection.
Common Shopify popup issues (and how to fix them)
The popup is not showing at all
Typical causes:
- The snippet is installed in the wrong file (not
theme.liquid) - The snippet was pasted after
</html>or outside the page structure - Targeting rules exclude the page you are testing
- You are testing as an admin and the tool suppresses admin sessions
Fix:
- Re-check placement right above
</body> - Temporarily set targeting to “all pages” and remove caps just to verify it can display, then restore rules
The popup shows twice
This usually happens when:
- The snippet is installed in two places (for example theme.liquid plus a Custom liquid block)
- You installed an app that injects a similar script
Fix:
- Search your theme code for the tool name or script URL and remove the duplicate
It worked, then stopped after a theme update
Theme updates can overwrite theme.liquid.
Fix:
- Document where you installed the snippet
- After theme changes, confirm the snippet is still present
- Consider using your tool’s recommended Shopify integration method (if it offers one)
Conversion dropped after launch
This is not rare. It typically means the popup is too early, too broad, or too frequent.
Fix in this order:
- Add stricter frequency caps
- Narrow page targeting (start with one page group)
- Move trigger later (scroll or time)
- Reduce friction (one field, one question)
UX and SEO guardrails you should not ignore
Popups can affect perceived quality if they block content or feel hard to dismiss, especially on mobile.
A practical way to stay on the right side of UX and search guidelines is:
- Avoid full-screen takeover popups on landing pages from ads and search
- Make close controls obvious and immediate
- Trigger based on intent (scroll, add-to-cart, exit) rather than instant load
For more background, Google documents how it evaluates intrusive interstitials in Search results on Google Search Central.
Frequently Asked Questions
Where do I paste a popup script in Shopify? Most script-based popup tools should be placed in Online Store → Themes → Edit code → layout → theme.liquid, typically right before the closing </body> tag, then saved and tested on the storefront.
Can popups slow down my Shopify store? Yes, depending on the tool and how it loads. Prefer lightweight scripts, avoid stacking multiple popup apps, and place scripts near </body> when recommended. After installing, check load performance and watch for layout shift or delayed interactivity.
What is the best trigger for a Shopify popup? It depends on intent. For lead capture, time-on-page or scroll depth usually performs better than “on page load.” For cart recovery, triggers tied to cart behavior (cart page view, exit intent on desktop) tend to be more relevant.
How often should a popup show to the same visitor? A solid default is once per session, then suppress for 7 to 14 days after dismiss. Always suppress after signup or purchase. The goal is to avoid training returning visitors to close your messages automatically.
Should I use a discount popup or a feedback popup? If you do not know what is blocking purchases, start with a one-question feedback popup on high-intent pages (cart, pricing-like pages, or key product pages). If you already know your funnel works but you need list growth, use a discount popup with tight targeting and strong caps.
Ship your Shopify popup without adding complexity
If you want a lightweight way to run popups for feedback, lead capture, and on-site updates, Modalcast is designed for simple deployment and fast iteration.
You can start with the Shopify flow in this guide (create a message, copy the script, paste it into theme.liquid, then add targeting and caps), and use Modalcast resources to go deeper on execution:
If you want, share what you are trying to improve (email list growth, cart recovery, or feedback) and I can suggest a specific trigger + copy + frequency cap setup to start with.
